In the fast-paced world of commercial kitchens, maintaining the quality of frying oil is paramount for ensuring the consistency and flavor of fried foods. Fryer oil test strips are indispensable tools designed to simplify this crucial aspect of kitchen management. In this article, we will delve into what fryer oil test strips are, their applications, benefits, and the proper methods for using and storing them.

Understanding Fryer Oil Test Strips
What are Fryer Oil Test Strips?
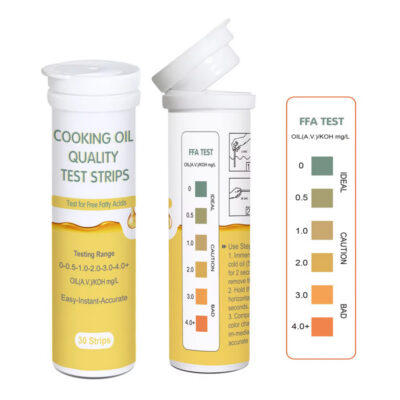
Fryer oil test strips are small, disposable strips infused with reactive chemicals that change color when exposed to degraded frying oil. These strips provide a quick and reliable method for assessing the quality of frying oil, helping kitchen staff determine whether the oil needs to be replaced.
Applications and Benefits
Fryer oil test strips serve various essential functions in commercial kitchens, contributing significantly to food quality, safety, and cost-effectiveness.
- Quality Control: Ensuring that frying oil maintains its intended flavor profile is crucial for consistently delivering delicious fried foods to customers.
- Cost Savings: By accurately assessing the condition of frying oil, establishments can optimize their oil usage, leading to significant cost savings over time.
- Food Safety: Monitoring frying oil quality helps uphold stringent food safety standards, reducing the risk of health hazards associated with degraded oil.
- Enhanced Taste and Texture: Fresh oil plays a pivotal role in achieving the desired taste and texture of fried foods, ensuring customer satisfaction with every bite.
These benefits highlight the invaluable role fryer oil test strips play in maintaining operational excellence and customer satisfaction in commercial kitchens.
How to Use Fryer Oil Test Strips
Mastering the use of fryer oil test strips is essential for accurately assessing frying oil quality and making informed decisions about its usage.
- Prepare the Strip: Carefully remove a test strip from its packaging, taking care to minimize exposure to external elements that could compromise its accuracy.
- Dip and Swirl: Submerge the test strip fully into the hot frying oil, ensuring that it is evenly saturated. Gently swirl the strip for a few seconds to facilitate the absorption of oil.
- Wait for Reaction: After removing the strip from the oil, allow it to undergo the specified reaction time, as indicated on the packaging, to observe the color change.
- Compare Results: Refer to the provided color chart and compare the color of the test strip to determine the quality of the frying oil based on the intensity of the color change.
- Interpret Results: Based on the color comparison, ascertain whether the frying oil meets acceptable quality standards or necessitates replacement.
Mastering these steps empowers kitchen staff to efficiently monitor frying oil quality, ensuring optimal performance and food quality in every batch of fried dishes.
Care and Storage
Proper care and storage of fryer oil test strips are essential for maintaining their effectiveness and accuracy over time.
- Keep in a Cool, Dry Place: Store test strips in their original packaging in a cool, dry location, away from direct sunlight and moisture, to prevent premature degradation.
- Avoid Contamination: Handle test strips with clean, dry hands to minimize the risk of contamination, which could compromise the accuracy of test results.
- Check Expiration Dates: Regularly inspect the expiration dates on the test strip packaging and replace any expired strips to ensure accurate results.
- Dispose Properly: After use, dispose of test strips in accordance with local regulations for hazardous waste disposal, as they may contain reactive chemicals.
By incorporating this process into your kitchen protocols will help to streamline your oil management practices, reduce waste, and consistently deliver high-quality fried foods to their patrons. With proper usage and storage, these simple yet effective tools can contribute to the success and efficiency of commercial kitchens. For more information, visit our Cooking Oil Test Kit page or learn more at wikipedia.org.


